Let's do a project together.
This will stretch you a bit and make you use everything we learned together. It's a bit advance but you have the skills to do it.
We're going to make the checkout page for a coffee app. It looks like this:
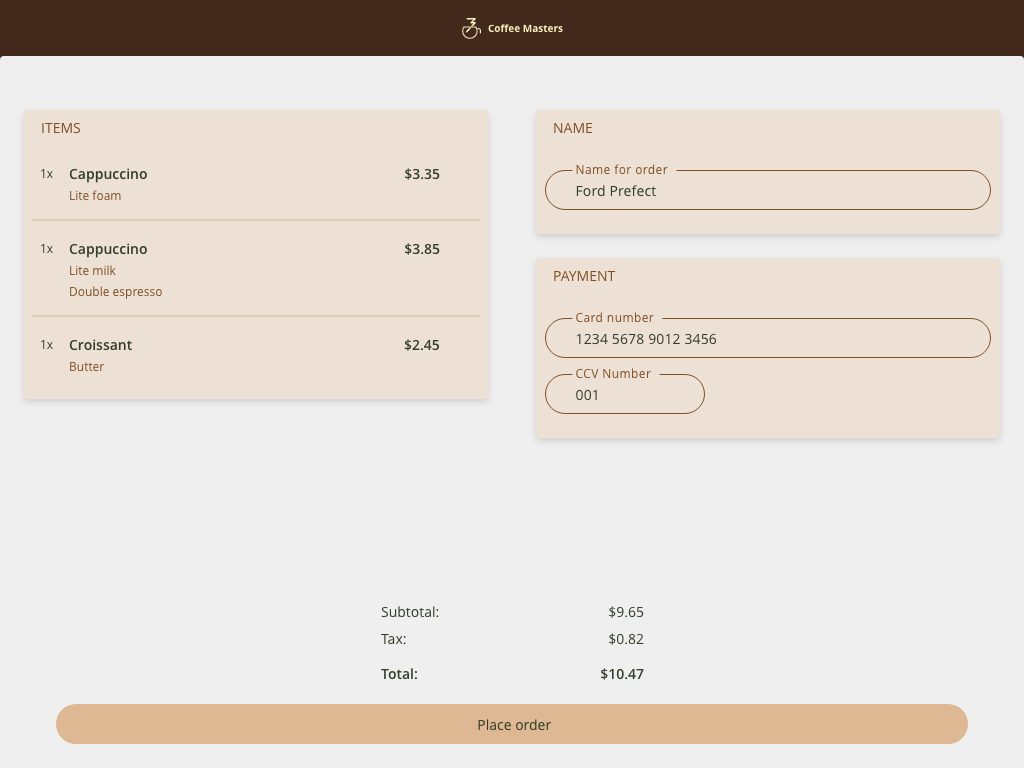
Some notes:
- You get to do the HTML and the CSS here.
- The logo for Coffee Masters is here.
- We didn't talk about how to make rounded corners. It's with border-radius.
- There are many ways to do this. Flex and grid would work well, just don't go overboard with grid, it'd be hard to 100% handle this layout in just grid.
- HTML inputs can be styled with HTML just as you expect.
- We also didn't talk about box shadows. You can give it the nice little shadow effect with the CSS property box-shadow.
- I took about 100 lines of HTML and 150 lines of CSS. Again, you do not need to do it the way I did. There are infinite correct ways to do this.
- I ended up using grid and flex in different places. Neither is required but can make some parts easier.
- You don't have to match the design perfectly. Just get the general style close.
Adding a web font
You can add a font using Google Web Fonts (lots of ways to do it, Google's is easy) by adding this tag in the <head>
<link
  href="https://fonts.googleapis.com/css2?family=Open+Sans:wght@400;700&display=swap"
  rel="stylesheet"
/>
and by adding font-family: 'Open Sans', sans-serif; to whatever you want to change the font to be. You don't have to but it's pretty cool! [Check out Google Fonts][font] if you're curious.
Overlayed Input
<div class="example-group">
  <label for="example" class="input-label">Example Text</label>
  <input id="example" class="example-input" placeholder="try typing here" />
</div>
<style>
  .example-group {
    position: relative;
    display: inline-block;
  }

  .example-input {
    border-color: crimson;
    padding: 8px;
    border-radius: 5px;
  }

  .input-label {
    background-color: white;
    color: crimson;
    font-size: 11px;
    position: absolute;
    left: 25px;
    top: -7px;
    padding: 0 2px;
  }
</style>
No HTML to display here
Just a quick example to show you how to overlay a label over an input's border
- We're using a containing div with
position: relativeset on it. This is so theposition: absoluteof the input label is absolute relative to to the containing div, and not the whole page. Try taking off the relative position of the container and watch the label fly somewhere else. - Labels allow users to click on the label and have that click select the input. Hence the
for=""attribute and how it matches theidof the input. - I then just eyeballed the best left and top values to use.
Good Luck!
This time I'm going to make you write both the HTML and the CSS. Consider this a capstone project for the first two sections!
Design credits for Coffee Masters to Alex Danielson (he also did this website!)
This is a hard one! Give it your best shot and tweet me the results!
